Aug 18 2009

Automated MySQL Install On Windows

If you need to install MySQL databases on a number of machines with roughly the same configuration then it becomes extremely tedious to run the installer wizard on each machine. You can download the MySQL server as a msi package which allows you to install with the MSIEXEC DOS command in windows hands free. To install all the necessary files for MySQL to run you need to type this command at the console:

msiexec /qn /i mysql-essential-5.1.37-win32.msi INSTALLDIR=C:\MySQL

The ‘/qn’ switch makes this install quiet. In this example I chose ‘C:\MySQL’ as the install directory. Feel free to replace that path with whatever you choose.

Just because MySQL is installed and has all the appropriate files registered doesn’t mean that it’s useful. You will probably want it to run as a service, have it listen on a certain port, and have a root user already set up. This can be done with the MySQLInstanceConfig.exe program, although the arguments are a little more involved.


C:\MySQL\bin\MySQLInstanceConfig.exe -i -q 
"-lC:\MySQL\mysql_install_log.txt" 
"-pC:\MySQL\bin" "-tC:\MySQL\my-template.ini" 
"-cC:\MySQL\my.ini" -v5.1.37 
ServerType=DEVELOPMENT 
DatabaseType=MIXED 
ConnectionUsage=DSS 
Port=3306 
ServiceName=MySQL
RootPassword=root1234 
SkipNetworking=no 
AddBinToPath=yes

The entire string above must be run as one line. If you just copy and paste then the console will error out. Most of the arguments above are straight forward if you’ve ever configured a MySQL server before but just in case I’ve detailed the parameters below.

-n product name
-p path of installation (no \bin)
-v version

Actions:
-i (install instance)
-r (remove instance)
-s (stop instance)
-q (be quiet)
-lfilename (write log file)

When launched manually, these can also be submitted
-t<.cnf template filename>
-c<.cnf filename>

Use the following options to define the parameters for the configuration file generation.
ServiceName=$
AddBinToPath={yes | no}
ServerType={DEVELOPMENT | SERVER | DEDICATED}
DatabaseType={MIXED | INNODB | MYISAM}
ConnectionUsage={DSS | OLTP}
ConnectionCount=#
SkipNetworking={yes | no}
Port=#
StrictMode={yes | no}
Charset=$
RootPassword=$
RootCurrentPassword=$

So if you use the example above you will get a basic mysql installation. When I used these commands I put them in a batch file followed by this command:

mysql –user=user_name –password=your_password db_name < create_database_and_tables.sql The ‘create_database_and_tables.sql’ obviously has all the sql code to create the MySQL databases and tables that are needed. The batch file installed, configured, and structured my MySQL databases. I spent awhile yesterday looking for a post like this so hopefully this saves someone some time.
Share

Aug 16 2009

Re-Enable Grub For Linux After Windows Install

Following the installation of Windows 7 on my desktop machine that was previously running Ubuntu 9.04, I realized that one of my partitions was missing. It was formatted as ext3 so of course it wouldn’t show up in windows. When I went to boot back into linux the grub boot manager was gone. The machine just booted straight into windows 7.

To re-enable grub was a lot simpler than I thought it would be. Since the Ubuntu 8.04 install disc that I had lying around also works as a live disc I booted my desktop off that. Once Ubuntu started up I opened up a terminal and typed these commands:


sudo grub
root(hd0,7)
setup(hd0)
quit

I then rebooted and grub was back to normal with both my Ubuntu operating system and windows 7 listed. Note that hd0,7 was the partition where I installed Ubuntu. If you installed linux before windows then you will probably want to use hd0,0. I installed windows 7 over a broken windows xp partition that I had installed before everything else.

If you installed ubuntu before you installed windows then you’re probably going to have to edit your ‘/boot/grub/menu.lst’ file. The grub documentation may be helpful.

Share

Aug 16 2009

Burning DVD ISO Images Fails In Ubuntu 9.04

I upgraded to Ubuntu 9.04 Jaunty Jackalope 64 from Ubuntu 8.04 Hardy Heron 64 the other day with the hopes that some of my issues with the operating system and desktop experience would be resolved. While a lot of my problems seemed to be improved if not fixed, the Ubuntu 9.04 upgrade did introduce one big problem that is a deal breaker. I can no longer burn dvd images. I can still burn CD data discs and I didn’t try and CD ISO’s because I didn’t want to waste the discs.

K3b gives me this error :


:-[ WRITE@LBA=0h failed with SK=3h/ASC=0Ch/ACQ=80h]: Input/output error
:-( write failed: Input/output error

And Brasero gave me this error :

BraseroWodim process finished with status 254
BraseroWodim called brasero_job_error
BraseroWodim finished with an error
BraseroWodim asked to stop because of an error
  error    = 0
  message  = "no message"
BraseroWodim stopping
BraseroWodim got killed
Session error : unknown (brasero_burn_record burn.c:2602)

Apparently other people are having the same issue. After a bit of searching I gave up on finding a fix or workaround for either K3b or Brasero. I even tried installing the Nero Linux Trial for 64 bit but I got some ambiguous write error.

I ended up taking my burner out of my ubuntu machine and putting it in an old windows box. The first dvd that I’m burning is a windows 7 install disc. After using ubuntu for about 6 months as my primary desktop operating system I think I’m done.

Share

Aug 15 2009

Windows Batch File Without Popup Console

Sometimes you need to schedule a batch file to run some script periodically on a windows server. I found myself having to run one fairly often and it would always pop up that annoying console window whenever I was in the middle of typing something. This sent me searching for a way to run the script without the pop up console window. There was a few ways to do this but I didn’t want to download and install any other software so I went the vbscript route. Here is what I did.

First create a file and call it ‘somefilename.vbs’ and put it in the same directory as the batch file that you want to run.
Next put this code in it :


Dim oShell
Set oShell = WScript.CreateObject ("WScript.Shell")
oShell.run "my-batch-file.bat", 0, False
Set oShell = Nothing

Now when you set up the windows scheduler you want to point it at the ‘.vbs’ file and not the ‘.bat’ file. That seemed to be the easiest and quickest way to get rid of the console popup when running a batch file on a windows server. If anyone has another method that doesn’t require the creation of a new file I would like to hear it. You could always do some reading on vbscript and just code everything in vbscript and not use a batch file at all but I didn’t bother.

Share

Aug 11 2009

Create A Simple Captcha With PHP and GD

Everyone hates captchas. I know I do. It sucks but they are a necessary evil. Most captchas are difficult (sometimes impossible) to read and they will consistantly drive visitors from your site. I’ve been on sites where the captcha was so hard to decipher that I’ve never gone back.

During the development of a new site I was forced to create one of these evil entities. It was surprisingly simple and painless. The captcha that I outline here is very, very simple and should never be used in production without a fair amount of tweaking.

Having developed my site using php I naturally turned to the GD library.

Firstly I generated a random string to display on the captcha :


//generate a random alphanumeric string of a specific length
function gen_random_string($length) 
{
  $characters = "0123456789ABCDEFGHIJKLMNOPQRSTUVWZYZ".
        "abcdefghijklmnopqrstuvwxyz";
  $real_string_length = strlen($characters) - 1;
  for($p=0;$p<$length;$p++)
  { $string .= $characters[mt_rand(0, $real_string_length)]; }
  return $string;
}

//add to session array so other scripts can access it for the comparison
$_SESSION['image_text']= gen_random_string(8);

//split into character array - str_split only works in PHP 5
$text_array = str_split($_SESSION['image_text']);


Now that I have my string I need to create the image. Make sure that GD is installed on your php apache server.

//create the image with a background image
$NewImage =imagecreatefrompng("bg1.png");
$cntr = 0;
foreach($text_array as $letter)
{
  //generate a random color for each letter
  $r = rand(0,200);
  $g = rand(0,200);
  $b = rand(0,200);
  $textcolor = imagecolorallocate($NewImage, $r, $g, $b);

  //random horizontal spacing
  $spacing = (rand(5,10)+($cntr*10));
  
  //add the character to the image
  imagestring($NewImage, 5, $spacing, rand(0,10), $letter, $textcolor);
  $cntr++;
}


The code above will generate a GD captcha image with random coloring and random horizontal and vertical spacing on top of a background image.
Now we just need to output it.

//output the headers than the image as a PNG
header('Content-type: image/png');
header('Cache-Control: max-age=0');
header('Expires: '.gmdate('r',time()-3600*24*365));
header('Pragma:');
ImagePNG($NewImage);
imagedestroy($NewImage);


So if I called this file simple-captcha.php I could call it with this html:

<img id='captcha' name='captcha' src="simple-captcha.php">


Here is what it looks like :

This captcha can be strengthened by using other GD image functions such as imagefilledellipse and imageline to create artifacts in the background. It also helps to use different fonts and to change the angle of the letters.

Share

Aug 4 2009

Personal Computers In 1979. The Apple II

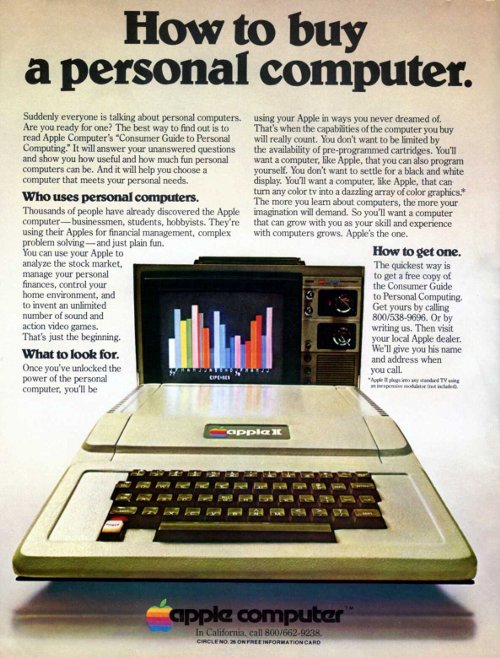
The Apple II was the first really successful mass produced microcomputer. Introduced in 1977, (the ad below is from 1979) this machine was a major technological advancement over its predecessor. By the end of it’s production in 1993 there were about five to six million produced and sold. Anyone that grew up in the 80’s or 90’s may recognize this machine from their education as it was the standard computer in American education.

The Apple II didn’t really have an operating system as we know them. It had a built-in BASIC interpreter contained in ROM. Any games or educational software came on 5¼-inch floppy disks that booted directly on the hardware. This computer was able to run DOS (an Apple specific flavor) and CP/M (which is an old school operating system).

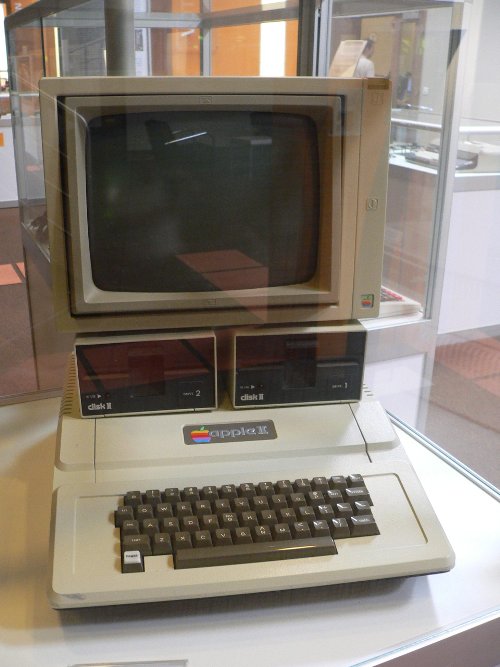
The original Apple II could hold a whopping 48 kilobytes of RAM although it only came with 4. It ran at 1 MHz and had an audio cassette interface for loading programs and storing data. The video controller displayed 24 lines by 40 columns of monochrome, upper-case-only text on the screen, with NTSC composite video output suitable for display on a TV monitor, or on a regular TV set by way of a separate RF modulator. The original retail price of the computer was US$1298[5] (with 4 kB of RAM) and US$2638 (with the maximum 48 kB of RAM). An external 5¼-inch floppy disk drive, the Disk II, attached via a controller card that plugged into one of the computer’s expansion slots (usually slot 6), was used for data storage and retrieval to replace cassettes.


Apple II Advertisement 1979


Apple II

Information and second picture came from Wikipedia.

Share