May 24 2009

Stream Video To The Iphone Using Tversity

Stream Video to Iphone with Tversity

After using Tversity for quite some time to stream my media to my Xbox 360 over my local network, I decided I wanted the same functionality on my iphone.
This is how I did it:

Logged on to my wifi with my iphone and pointed safari to: 192.168.2.10:41952 which is the ip address of my tversity windows server.
41952 is the port that the tversity mediaserver listens on.

I was then shown a nice and easy to navigate web interface to browse through all my folders.

After locating a basic xvid tv show I selected “Play in Media Player”.

The iphone loaded the media player and seemed like it was going to load the movie but then this error popped up.
“This movie format is not supported”.

I searched and searched for a solution to this but found none so I transcoded a video file using one of the many ipod touch video converter programs and added it to my media in tversity.

When I browsed to this file in Tversity and clicked play it worked.
It’s kinda a pain that Tversity can’t handle converting these files on the fly but it’s still useful to watch videos on my mobile

Share

May 23 2009

Iphone Lag Fixes

I’ve been spending way to much time on my iphone lately and It’s been becoming a little unresponsive. When I scroll I notice the refresh rate is delayed and loading programs like phone, sms and safari are delayed. At first I thought that my theme was the cause but even after turning off all winterboard effects I still have the same problem. I decided to research the issue and here are my results.

  • The iphone is said to never shut a program down so the memory of the device is getting saturated. To cure this you need to reset the device.You would think that powering down and back up again would do this but apparently you need to hold the power button and the home button at the same time until the iphone shuts down.
  • Remove unused programs. As soon as I got rid of a few of the apps that I never use the phone started responding a lot quicker but still not quick enough.
  • Turn off ssh. Running the ssh daemon in the background is using resources. If you’re not scp’d or ssh’d into the phone at the moment then why do you have it running?
  • Turn off the GPS services. If you need it then turn it back on. In Settings => General click “Location Services” to off. This will also help with battery life on the iphone.
  • If you’re suffering from SMS lag I’ve read that opening and closing the app store solves the problem on the iphone.

Mostly straight forward but still useful. I’ve found that Winterboard does not cause any lag whatsoever. I’ve tried multiple themes and played around with each and they don’t seem to lag the phone out at all.

Share

May 15 2009

Read PDF’s Locally on the Iphone With Safari. No More Emails or URI Hacks

Read PDF’s Locally on the Iphone With Safari. No More Emails or URI Hacks

Essentially you can browse your entire iphone filesystem using this method but I just want to read PDF files as easily as possible.

I’ve been trying recently to find a proper PDF reader for the iphone that doesn’t really screw up the formatting or require very manual conversions and it seems that safari’s built in pdf reader is better than stanza and other readers.
Because safari on the iphone is not able to view files that are local on the device we need to do some quick work to make safari on the iphone read local files.
For this to work you will need to be able to access the iphone file system from a personal computer somehow. Check out how to get SCP on the iphone working.

First you will need to install the lighttpd program from cydia. It was under the networking section. Lighttpd is a tiny webserver for the iphone or ipod touch.
Once you’ve got lighttpd installed you will need to connect your iphone to your pc and open up SCP or a program similar over either wifi or through USB.

The version of lighttpd that I got from cydia didn’t have a default configuration file. So I created a file called lighttpd.conf which is extremely simple.
I chose not to put anything specific in the file because I never plan on accessing this iphone webserver from anywhere other than localhost.

server.document-root = “/var/www/”

server.port = 80

mimetype.assign = (
“.html” => “text/html”,
“.txt” => “text/plain”,
“.jpg” => “image/jpeg”,
“.png” => “image/png”
)

dir-listing.activate = “enable”

To check that your syntax is ok, log into the iphone with ssh or use a terminal app locally on the iphone and locate the lighttpd.conf file. I put mine in /etc.
Type this at the iphone prompt.

lighttpd -t -f lighttpd.conf

You should get “Syntax OK” after typing that into your iphone.

To start lighttpd:

lighttpd -D -f lighttpd.conf

Your document root on the iphone is now /var/www (if you used my configuration file) so start putting pdfs in there and you’ll now be able to read all those pirated ebooks that have been just sitting there taking up hard drive space for so long.
When you point safari to http://127.0.0.1/ you will now see a list of the pdfs (or whatever else you want to put in there).

Share

May 14 2009

Give Website a Custom Icon for the Iphone

To put a custom icon for a website on the home screen of your iphone or ipod touch you will need a PNG file which is 45×45 pixels.
Call this icon apple-touch-icon.png and store it in the root of the website. Not sure how to add a custom icon to other peoples websites yet.

Of course, to create the link, you will want to go the page in safari and select the ‘+’ button and then select the “add to home screen” option.

Check the icon at this iphone web application example.

If you want to add an icon image that is located somewhere else then use this

<link rel=”apple-touch-icon” href=”/images/iphone-icon.png” />

Share

May 14 2009

Iphone iwebkit Example

Create Custom Iphone or Ipod Touch Web Applications Using iWebKit

For the impatient people like myself, heres what it looks like. You want to point your iphone browser to this location and hit the ‘+’ button at the bottom and select add to the homescreen. This will get rid of the navigation bar on in safari and make the iwebkit example look like a native iphone app.

Here are the steps to take in order to get this working.
Get the frame work: iWebKit framework (I used 4.5.3 for this guide)
Extract the iwebkit and take a look at the manual. Iwebkit comes with a few examples of how to use the key framework elements.We’re going to make a very rudimentary application for the purpose of iphone iwebkit example. Ajax integration with iwebkit will come later.

First you will need to create a directory on your web server and extract the iwebkit files into it.
The webkit contains a few examples but most of them didn’t show up properly for me when I used the Iphone.
Most webapps are built with just really basic html. The custom elements that iwebkit provides are called by normal divs with certain ids.

First start with an extremely basic html skeleton page :

<html>
<head>
<meta content=”yes” name=”apple-mobile-web-app-capable” />
<meta content=”text/html; charset=iso-8859-1″ http-equiv=”Content-Type” />
<meta content=”minimum-scale=1.0, width=device-width, maximum-scale=0.6667, user-scalable=no” name=”viewport” />
<title>iphone iwebkit example</title>
</head>
<body>

</body>
</html>

Hopefully no explanations are needed there. Notice the meta tags? So now we need to start adding the iphone javascript and css.
To get started with iwebkit for the iphone or iphone touch you only need to include two files into this basic html page but you will need to take all four folders from the Framework folder and put them into the directory where you want to host your web app.
Add these two lines to the head portion of the skeleton html file outlined above.

<link href=”css/style.css” rel=”stylesheet” type=”text/css” />
<script src=”javascript/functions.js” type=”text/javascript”></script>

Now to start putting the application together using iwebkits basic elements.

Top Bar
This section will outline the options for the navigation bar at the top of the page on the iphone or ipod touch.
Using iwebkit for the top bar we will normally put navagation buttons and a title like this.

<div id=’topbar’>
<div id=”leftnav”>
<a href=”index.html”><img alt=”home” src=”images/home.png”/></a>
</div>
<div id=’title’>
iphone iwebkit example
</div>
<div id=”rightnav”>
<a href=”index.html”>Next</a>
</div>
</div>

There are four div elements there that make up this top bar. The first is the bar itself and it encompasses the other three elements.
The second is the leftnav div. This specifies that the elements within this div are to appear at the left side of the bar (Big surprise).
The third is the title. The fourth is the rightnav which will appear on the right side. You’re probably going to want to put links and pictures in the leftnav and rightnav divs.
Instead of the rightnav div it is possible to put a rectangle button instead of the arrow button just by changing rightnav to rightbutton in the id.

Content
This section is for basically anything you want to put in your iwebkit page. I’m going to demonstrate a simple iphone-looking list here:

<div id=”content”>
<span class=”graytitle”>Iphone iwebkit example</span>
<ul class=”pageitem”>
<li class=”textbox”>
<p>Some Text for the iwebkit example</p>
<p>More text for the Iphone</p>
</li>
<li class=”textbox”>
<span class=”header”>Iphone iwebkit</span>
<p>Iphone Iphone</p><p>WebKit WebKit</p>
</li>
<li class=”menu”>
<a href=”index.php”>
<img alt=”Description” src=”thumbs/basics.png” />
<span class=”name”>Iphone iwebkit Example</span>
<span class=”comment”>Comment about iwebkit</span>
<span class=”arrow”></span>
</a>
</li>
<li class=”store”>
<a class=”noeffect” href=”index.php”>
<span class=”image” style=”background-image: url(‘image.jpg’)”></span>
<span class=”name”>Iphone Song</span>
<span class=”comment”>iWebKit Comment</span>
<img alt=”rating” class=”stars” src=”images/4stars.png” />
<span class=”starcomment”>13 Reviews</span>
<span class=”arrow”></span>
</a>
</li>

</ul>
</div>

There are a lot of options when using iwebkit. Most are pretty self explanatory, like the <ul> class and the <span> and <li> classes, but who wants to remember all that.
So go check the source of some feature or look that you want on your iwebkit page at <a href=’http://m.iwebkit.net/index.html’>this demo</a>.

The first issue I had when looking at my iwebkit example on the iphone was that the example iwebkit application wasn’t fullscreen in safari.
The only way that I’ve found so far to make this web application look like a native iphone application is to go to the page in safari and then hit the ‘+’ button at the bottom and select add to the homescreen.
This will get rid of the navigation bar on the iphone and make the iwebkit example look like a native iphone app.

This example and the full source for this iwebkit iphone example  can be looked at here.

Share

Apr 20 2009

Solved: The iPhone cannot be synced. The required disk cannot be found.

I got an error tonight that read “The iphone cannot be synced. The required disk cannot be found.”
Of course, having had almost all my gadgets die on me many times before I jumped to the though of just reinstalling the original firmware for my iphone 3G. But I did some research first on the sync error and why it can’t find the required disk.

My initial assumption was that the “required disk” was the iphone drive itself and I’m very glad that I was wrong.
This sync error was happening on my iphone due to trying to sync the iphone with a ringtone that was on a network drive that I recently reformatted and reorganized. Disabling the files that were on the network drive in itunes completely solved my problem. So if you ever read “The iphone cannot be synced. The required disk cannot be found.” Make sure that all the files that you are trying to sync are actually accessible.

Share

Apr 20 2009

Change Iphone Boot Logo. W/O Reinstalling Firmware

It has become really easy lately to change your boot logo on the iphone. Before If you wanted to get rid of that silly apple or odd pineapple then you would have to recompile your firmware and use quickpwn to reinstall. That is because, on the iphone and I would imagine ipod touch also, this image is stored in the boot loader. So it’s not as easy as just using scp to upload a new image to a certain directory.

Luckily an app has been released that allows you to replace the boot image on the iphone with any image you like. The iphone and ipod touch seem to like png images so I would recommend exporting your image as one.

The screen on the iphone is 320 by 480 pixels and your image can use every pixel. The iphone will not play animations during boot yet though.

So how to do it. As long as your phone is jailbroken and you have cydia installed on your iphone or ipod touch then you can just load up cydia and touch the sections button at the bottom.
After the list shows up scroll down to find the LogoMe entry. Touch it and then install it.

Once the application has been installed on your iphone or ipod touch then launch it from the springboard. You will be given the option of adding an image for the boot logo from either the web by providing a url or from the pictures that you have locally on your iphone. I used the web option and provided www.codytaylor.org/iphone/grumpy_ninja_iphone.png
Which looks like this:

ninja boot logo for iphone

ninja boot logo for iphone

Check the preview to make sure it looks good before you set it as the default boot logo for your iphone or ipod touch. After you’re satisfied that it looks good then hit the install button and wait. It took a bit for it to flash my iphone with the new image and hopefully it won’t take much longer on the ipod touch.
After the install process finishes then reboot and check it out.

I also put this one together:

ninja iphone boot logo

ninja iphone boot logo

Share

Apr 19 2009

Create IPA from .app folder for the Iphone/Ipod touch to install through itunes.

An .ipa file can be opened by itunes and used to sync your iphone or ipod touch easily. The benifits of adding applications this way is to click once and have the application installed. Unlike making an iphone tunnel and using SCP to transfer the files over to the iphone or ipod touch.

I found this laying around the web and thought that it will probably useful in the future.
To build an .ipa file from a .app folder you will need to create a folder called Payload and place the .app folder inside of that.
Zip up the Payload folder, then rename the file with a .ipa extension. You can use any name you like so long as the extension is .ipa.

If you want the applications artwork to appear in iTunes (instead of a generic icon), you need to place a file called iTunesArtwork (with no extension) into the zip file on the same level as the Payload folder (not in it). This is actually a jpeg file of a 512×512 image and this will appear in iTunes for the app.

I haven’t had a chance to try this yet due to mostly developing web apps so far (No Mac OS Here) but I’ve seen many posts that it works. So any feedback would be great. Of course you need a jailbroken iphone or ipod touch for this to work along with having downloaded at least one legit free application from the apple app store.

Share

Apr 5 2009

SSH and SCP into your Iphone with USB instead of WIFI. Only the Useful.

I had to go through four or five iphone SCP/SSH howto tutorials before I got it to work. So I figured I’d put only the useful steps here without all the garbage that the other sites spew. Here are the useful steps that allowed me total root access through SSH and SCP to my iphone harddrive. This guide requires that you have already jailbroken your iphone. Jailbreaking is stupidly easy and there is plenty of tutorials out there on how to do it.

First download this file. You will need to unzip it.
Run that file and a black DOS window should be displayed.

Next download this file. You will also need to unzip this one.

Before we log into the iphone with SCP we need to disable Auto-Lock because when the phone goes to sleep it drops the connection. On your iphone go to Settings -> General -> Auto-Lock. Set it to Never.

Make sure you have the OpenSSH package installed on the Iphone. If you don’t then go to Cydia on your iphone and select categories. I think it is in the networking category but I could be wrong. It’s in there somewhere. Install it.

Make sure you still have that black DOS window running. Without it you will be unable to connect to your iphone.

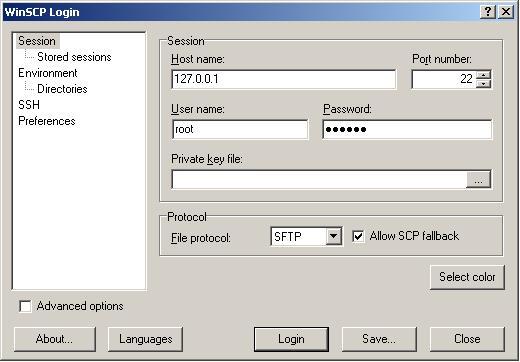
Now run WinScp. Enter 127.0.0.1 as the Host name. Leave the port number on 22. User ‘root’ for the username and ‘alpine’ as the password. Hit the Login Button.

SCP to Iphone

SCP to Iphone

You will be prompted about adding a RSA host key. Click Yes.

Now you have complete access to the Iphone’s filesystem.
If you want to SSH in then download Putty and use the same settings to SSH in. Always make sure that the itunnel black console (DOS) window is running.

-Cody Taylor

EDIT :
I did this again today and it wouldn’t work right away. I was getting this error on the iphone tunnel black screen when I tried to use SCP to log in.


new connection !
AMDeviceNotificationSubscribe = 0
iPhone attached !
AMDeviceConnect = 0
AMDeviceIsPaired = 1
AMDeviceValidatePairing = 0
AMDeviceStartSession = 0
MobileDevice: AMDeviceStartService: AMDeviceStartService: Could not connect to USB mux (error 10061)
AMDeviceStartService = -402653131
AFCConnectionOpen = 0

I was puzzled at first but then I realized why I couldn’t SCP into my iphone. I had turned SSH off from within the SBSettings menu. How would SCP work without SSH? It won’t.

Share